|
Restoration
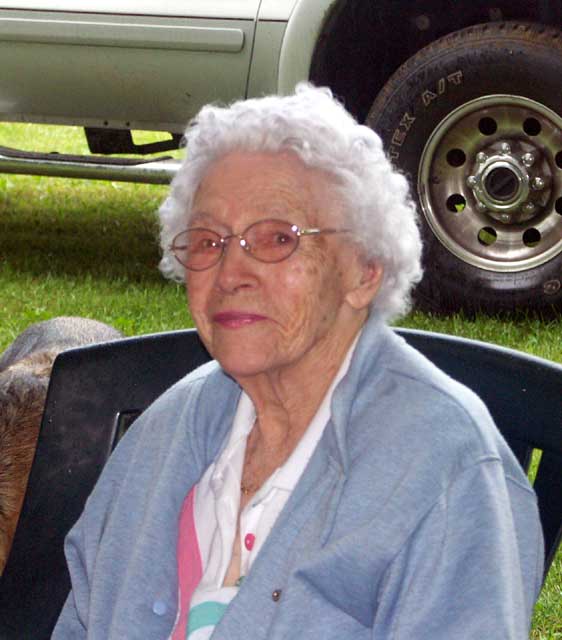
A Tribute to my Grandparents
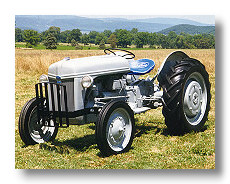
The 9N spent ten idle years in a shed before it was
given a restoration. This tractor holds a lot of sentimental value.
The restoration
began in Aug. of '96 and was completed in July of '97. You need
motivation when restoring a tractor. My grandmother was the motivating
factor of this project. She's was 92 years young when she passed away
on May 15th, 2006. She was the most generous and kindhearted
person I have ever known. Making her proud by restoring
a part of the family's history meant everything to me.
Let me take you behind the scenes and tell you some of the steps taken
in my restoration process.
First- I had
a "plan of attack". I made a list of items that need fixed.
I worked on one area of the tractor at a time until I had everything
in good working order. I repaired as many seals/gaskets that I thought
was necessary. You don't want oil leaking all over your fresh new paint
job.
Second- I had
my brother power wash the tractor. He owns and operates a power washing
business called "Pressure
Plus". This removed all of the years of grease,
grim, dirt, and loose paint. It made it easier for the sandblasting
process.
Third- I sandblasted
the entire tractor. I removed all sheet metal , wheels, and miscellaneous
parts and blasted those separate from the chassis of the tractor. Take
caution when sandblasting your tractor. Tape up all areas where sand
could get into your drive train.
Fourth- Involved
the two part painting process. I powder coated all of my sheet metal
and miscellaneous parts. Only the chassis and rear wheels were wet paint.
I used powder from Tiger Drylac, "RAL 7001 series 49-0", for
my color choice. It's somewhat lighter than the original "Ford
9N Grey", but it looks good to me. My powder coating man/co-worker/friend,
from Metlfab,
Inc., also applied a "clear coat" type of powder
after the regular powder was applied and baked. This added to the already
glossy finish. Gives an extra layer of protection as well. This stuff
is tough material. I had a powder coat sample made while my parts were
powder coated. I used this sample to get a custom color wet paint to
match the powder. I used PPG's DCC acrylic urethane paint with DP402
epoxy primer catalyst and DT885 reducer on top of DP40 epoxy primer
gray green to complete the job of painting the chassis and rear wheels.
I also want to mention that I had the manifold and exhaust system sandblasted
and painted with a high temperature paint. This keeps the "rust"
factor away from your beautiful paint job.
Top
|


